
ADVERTISEMENT
4. First fold
Gently roll the dough into a long rectangle.
Try not to press too hard because you don’t want the butter to break through the dough.
Once the dough is approximately three times as long as it is wide, fold it into thirds, just like folding a letter.
ADVERTISEMENT
This is called a single or letter fold.
Wrap the dough and place it in the refrigerator for approximately 30–45 minutes.
5. Second fold
Remove the dough from the refrigerator and place it on a lightly floured surface.
Turn the dough so the folded edge is positioned correctly for rolling.
Roll it again into a long rectangle and fold it into thirds.
Wrap it and refrigerate for another 30–45 minutes.
The dough should remain cold throughout the process. If the butter starts to soften or leak, stop rolling and refrigerate the dough before continuing.
6. Third fold
Repeat the same process one more time.
Roll the dough into a long rectangle and fold it into thirds.
Wrap it tightly and refrigerate for at least 30–60 minutes before shaping.
At this stage, the dough should contain many thin layers of dough and butter. These layers are what create the beautiful flaky texture of a classic croissant.
🥐 7. Shape the croissants
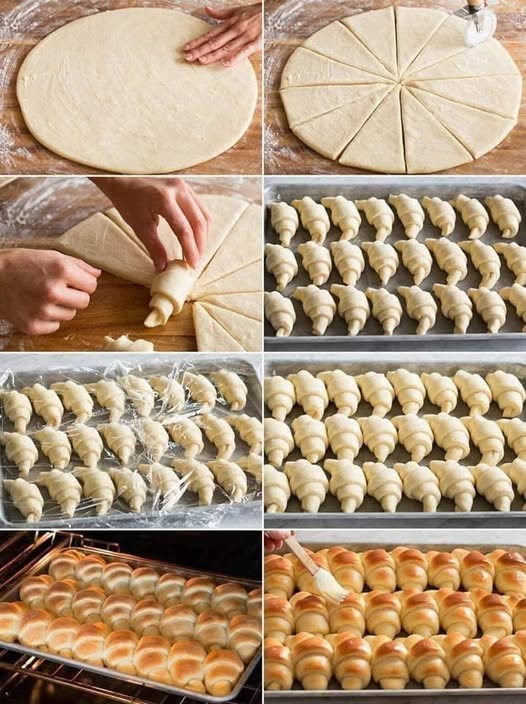
Roll the chilled dough into a large rectangle approximately 5 mm thick.
Using a sharp knife or pizza cutter, cut the dough into long triangles.
Each triangle should have a wide base and a long pointed tip.
Make a small slit in the center of the wide end of each triangle.
Gently stretch the triangle slightly, then roll it from the wide end toward the pointed tip.
Don’t roll the croissant too tightly. Leave enough room for the layers to expand during proofing and baking.
Place each croissant on a parchment-lined baking tray with the pointed end underneath.
Curve the ends slightly toward each other to create the traditional crescent shape.
⏰ 8. Let the croissants proof
This step is extremely important.
Cover the shaped croissants loosely with plastic wrap or a clean towel.
Leave them at room temperature for approximately 1½–2 hours, depending on the temperature of your kitchen.
The croissants should become noticeably puffy and light.
You should be able to gently shake the tray and see a little movement in the dough.
Don’t rush this stage. If the croissants are under-proofed, they can become dense and heavy instead of light and airy.
🥚 9. Prepare the egg wash
In a small bowl, whisk together:
1 egg
1 tablespoon milk
Once the croissants are fully proofed, gently brush the tops with the egg wash.
Try not to brush heavily along the cut edges, because too much egg wash can stick the layers together and prevent them from expanding properly.
🔥 10. Bake
Preheat your oven to 200°C (400°F).
Place the tray in the oven and bake for approximately 8 minutes.
Then reduce the temperature to 180°C (350°F) and continue baking for another 10–15 minutes, or until the croissants are beautifully golden brown.
The exact baking time may vary depending on your oven and the size of the croissants.
They should be deeply golden, crisp on the outside, and beautifully puffed.
✨ 11. Cool and serve
Remove the croissants from the oven and allow them to cool on a wire rack for approximately 10–15 minutes.
They are delicious while still slightly warm.
Serve them with:
Butter
Jam
Honey
Chocolate spread
Fresh fruit
Cream cheese
Coffee
Tea
Hot chocolate
You can also slice them in half and use them to make delicious breakfast sandwiches.
💡 Important Tips for Perfect Croissants
Keep everything cold
The biggest secret to flaky croissants is temperature control. The butter needs to remain cold enough to stay in distinct layers.
If your kitchen is warm, refrigerate the dough more frequently.
Don’t overwork the dough
Knead until the dough becomes smooth and elastic, but don’t keep working it unnecessarily.
Don’t use melted butter
For lamination, the butter should be cold and flexible—not melted.
Melted butter will blend into the dough instead of forming separate layers.
Be patient with proofing
Proper proofing is essential for light, airy croissants.
If they haven’t puffed enough before baking, the finished croissants may be dense.
Don’t roll too aggressively
When rolling the laminated dough, use gentle and even pressure. You want to stretch the layers rather than crush them.
Bake until deeply golden
Don’t remove croissants from the oven too early. A rich golden-brown color usually means the outside is crisp and the inside is properly baked.
🧊 Make-Ahead Croissants
Homemade croissants are perfect for preparing ahead.
You can shape the croissants and place them on a baking tray. Cover them well and refrigerate overnight.
The next morning, take them out and allow them to come to room temperature and proof until puffy.
Then brush them with egg wash and bake as directed.
This makes them perfect for a weekend breakfast or brunch.
❄️ Freezing Croissants
You can also freeze shaped, unbaked croissants.
Place the shaped croissants on a tray and freeze them until firm. Transfer them to an airtight freezer bag or container.
When you’re ready to bake them, place them on a lined baking tray and allow them to thaw and proof until they become light and puffy.
Then brush with egg wash and bake.
ADVERTISEMENT